Showing posts with label DIY. Show all posts

Thursday, 28 June 2012

DIY studded jumper

Hello bloggers!

Not posted much this week, been making the most of my recent free time (by sleeping...lots...hah)
Anyway, because of the wonderful response i got from my last DIY i thought i would treat you to another one! I went on a major shopping spree on Monday and picked up a few things that are perfect for a bit of DIY! So stay tuned for more :)

Anyway if you want to see how to add your own studding detailing to a plain jumper then read on!


This is the finished look, it's super duper easy to do (i promise) literally took me about 10-20 minutes to do once i got all my stuff organised!


First you will need to find a jumper you want to studify! I found this little beauty in Primark when i was on my massive shopping spree. I haven't really been shopping in Primark much recently but went in for a little browse and was pleasantly surprised! I spotted this in a huge pile of stock that was just waiting to go out on the rails and much to the un-amusement of the staff, i grabbed it straight off the pile! It was a complete steal at £12!!! I got it in a size 14 so that it would be bit bigger and baggier than it should be! It seriously looks like a jumper i have been lusting after in the TOPSHOP petites section sooo it made sense to buy this cheaper alternative! Anyway, rambling over, i thought it would look nice with some studding detailing.
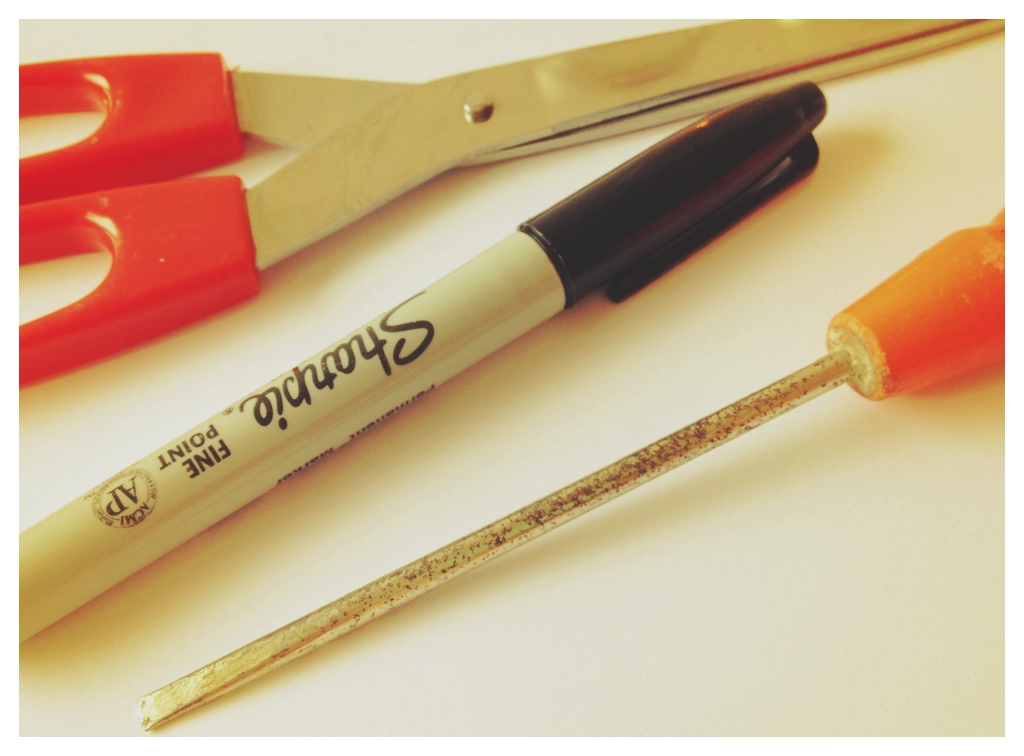

You will need to get yourself some scissors, a sharpie marker and a square ended screw driver. I had these things just laying around my house. If you're not sure if you have a screw driver, ask your dad, he will surely have a tool box full of them! Also, the type of screw driver you need will depend what type of screw back studs you purchase, so get your screw driver AFTER you get the studs!


Finally you will need to get yourself some screw back studs! I got mine from ebay HERE. I got them a while ago for a previous DIY project (studded denim shirt collar if you're interested). So i'm just using the leftover ones for this design. They are roughly £10 for 50 studs so are really cheap when you think how many different projects you can use them in!


The first thing you need to do is decide how many studs you want to use and where you want them to be. I decided to use 13 studs (mainly because that was pretty much all i had left...) I think odd numbers work best for this design because you can have one stud marking the middle of your collar and then work out in even numbers. So for my design, i worked out where the middle of my collar was and used my sharpie pen to make a small dot roughly where i wanted the stud to be (don't worry too much about the mark being really dark, the stud will cover it when they are in!). Once you have decided where the middle stud should be, i marked 6 dots on either side of the middle stud all the way to the side seams of the jumper. Obviously if you have decided on a different number of studs you will mark more or less dots! The placing of the dots is the most difficult bit really... And its not even that hard anyway ;)


This step is optional. Since my jumper is quite a loose knit it allowed me to push my studs through very easily, however if you have chosen a tougher jumper you will need to use your scissors to make a little hole where you marked your dot just to help the stud push through.


Now take the screw back piece of the stud and push it through from the back (so that the flat piece is on the inside of the jumper and the screw piece is sticking out the front) 


This is what it should look like on the INSIDE of the jumper :)


Now grab the top stud piece and screw it on top of the screw piece you just pushed through. You only need to screw the stud piece a couple of times to lightly secure it. You will tighten it properly in the next step.


Get your screw driver and on the back of the collar fasten the stud in place by screwing the piece in place as much as you can. (usually only takes about 3/4 turns)


Just keep on repeating the above steps over the top of your marked template until you have got all the studs on.


And thats it! Super quick and super easy! Its a really nice way just to add a subtle bit of edge onto wooly jumpers. You could carry the studding detail right the way around the back as well if you like so that it is visible when your hair is tied up or if you have short hair, the choice is yours :)

I hope i've inspired some people to spruce up jumpers they already own or head out and buy a cheap jumper to DIY. It's seriously a MUCH cheaper alternative to buying pre-studded jumpers. 

ps,


How cute are these flowers my Mum bought be for getting my unconditional for uni? Love you muuum :)

Over and out lovelies!!!! 

X


Sunday, 17 June 2012

DIY Spike and Skull Necklace

Helloo!

I have been seeing a lot of the spike style necklaces in high street stores lately and it got my DIY ideas flowing! I've put together a really nice and simple (or so i hope :S) DIY tutorial on how you can create your very own spiked necklace! Two DIY's in a row, i must be mad!


This is the necklace i'm going to show you how to make! It took me around half an hour and wasn't rocket science so i'm sure this tutorial will be nice and easy!


MATERIALS
The bits and bobs you will need to create this necklace are:
- Howlite skull beads in any colour or size you like! (I ordered mine from Ebay HERE)
- Some gold/silver seed beads, available from any craft shop (Be sure they are big enough for the elastic)
- Pin spikes (I got mine from a TOPSHOP hair bobble that i spotted in the sale but you can get them from Ebay HERE. They come in super funky colours)
- Some jewellery elastic, extra strong is best. (get this from a craft shop)
- Necklace fastenings (You can buy them from craft shops but i just chopped them off of an old necklace... whoops!)
- You'll also need scissors and possibly a needle and pliers 


First, cut your elastic to however long you want it. I find it easiest to pull out a long piece and hold it around my neck until i get it to the right length drop. The length i used was around 30cm (add a little extra for tying off) 

Next, lay out or spikes and skull beads for the centre piece. You could do yours in the same pattern as mine or make up your own (don't make it too heavy or the elastic will drape too much).


Now take only the clip part of the necklace fastening and tie the end of the elastic through the small chain which should be at the end of the clip. (you don't have to tie a bead in with it like i did, it makes no difference). I personally tied about 10 single knots over and over again to make sure it was secure! But don't pull too tight or you'll break it. You can leave as much of a tail end as you like, i always leave a centimetre or two.


Take your gold and silver seed beads and thread them onto the elastic. You can do as much of this as you like but remember the same has done be done one the other side once you have put the centre piece in! I did 10cm of beading on either side. Try and place the beads on randomly so it doesn't have too much of a patterned effect.


Picking up from where you stopped with the gold and silver seed beads start placing on your centre piece design. (don't worry if its not sitting quite right, it will when it's hanging around your neck!)


Using the seed beads again, do the same length and style along the other side. Try and do it as evenly as possible to that the spikes and skulls will hang in the centre of the necklace.


Now finally, take the chain part of your necklace fastening and tie the elastic through the end chain. Try to get the knot as close to the last bead on the elastic as possible (its alright if you stretch the elastic out a little bit when you are tying the knots. It will loosen up when worn.) Again, i tied the knot several times just to be sure it was secure!

TIPS:
- You can use a chain if it's thin enough to fit through the beads.
- If you don't want the elastic stretch effect buy extra strong thread and use that.

And thats it! Really simple and makes a lovely necklace! Doesn't look too 'homemade' either eh?!


I hope you all like this enough to try it! If you need any help don't hesitate to ask! And i welcome your feedback! :)


over and outttt! X


Thanks to everyone who has followed me and commented on my posts so far! x

Saturday, 16 June 2012

Pastel gradient nail's tutorial

Hello Lovelies!

The shops this month are packed full of gradient/dip-dye/ombre style clothing and what better to go with a dip-dye outfit than matching nails?! I've put together a short tutorial on how i do my gradient style nails. There are probably lots of different methods but this is how i find it easiest. (I am not in any way a beauty expert, i just like to paint my nails!) This is slightly more a beauty post rather than a fashion one but you can't have bare nails!


In this tutorial i'll show you step by step how to create the design in the picture above, It's super easy to do and really quick! Enjoy :)


Firstly you'll need to gather your materials. I have chosen to do my nails in two pastel colours, however you could do your's in as many or as few as you like! Be creative :)
I used:

- Barry M Nail Paint in PEACH MELBA
- TOPSHOP Nails in GONE FISHING
- Rimmel Nail Tip Whitener

You will also need a makeup sponge to create the gradient effect (you could also use a q-tip or a household sponge if you don't have makeup sponges! But you can get them from any high street chemist!)


Paint your nails in your chosen colours (remember to do a thin base layer of the colour and let it dry completely. Then paint another layer on top. Keep layering until you think its thick enough) let your nails dry completely before moving onto the next step.


Using your white nail varnish, pour a small amount onto a piece of paper and dab the tip of the sponge into it until it is covered. Dab the sponge a couple of times onto the paper to take off any excess before applying to the nails.


Gently dab the sponge down 3/4 of your nails (so that there is still a small amount of colour left at the bottom. You don't want this layer to be too thick. if it goes on too dark take a clean sponge and dab over the nail until some of the white has lifted)


Cover the sponge in a little more white nail varnish (you may need to pour some more onto your paper)  and dab the sponge over half of your nail this time. You will start to see the slight gradient appearing now!


Once more, put a little bit of white nail varnish onto the sponge and dab the very top part of your nails, It is up to you how far down you want to do this layer (i would recommend not too much or you might spoil the effect!) Repeat this step again if you want the look to be bolder.


Finally, Using a q-tip (cotton pad or a little bit of toilet roll will do too) gently remove any excess nail varnish around the edges of the fingers with a little bit of nail varnish remover!

VOILA! You're done! Finish with a top coat if you want a shiny finish or leave them as they are for a matte finish! You don't have to use white as the gradient you could use a contrasting colour, or black if you want to use darker colours rather than pastels. The choice is yours!!

I hope this has been helpful, If you need any tips or don't understand anything leave a comment below! I like your feedback! If you try this out send me your pictures or link me to it!


Over and out lovelies :) x

I'd like to say thank you to everyone who has followed me and commented over the past few days! I'm only just getting started so it means a lot THANKS! x